How to Make Rock Blaster Game on Scratch? | A Step-by-Step Tutorial [+Free game code]
- Pallabi Mohanty |
- May 30, 2024
Updated By
Reviewed By
Scratch games are visually fun and interactive ways of learning coding and game development, especially for children between the ages of 8 to 16. A rocket blaster game on Scratch can be of different types depending on the sprite’s movement, objective, and rewards.
In this blog, we will give you a step-by-step tutorial on how to create a rock blaster game on Scratch.
Looking to learn Scratch coding? Explore Wiingy’s Online Scratch Coding Classes For Kids to learn from top Scratch coding experts.
What is a rock blaster game on Scratch?
A Rock blaster game is a game where you [the player] control the rocketship and fire the laser to blast the space rock. Above, you can see a rocketship shooting a laser, and if the laser touches the rock, the rock blasts, and the score will increase by 100. Using the up and down arrow keys, you can control the direction of the rocketship in the up and down order.
The rock blaster game-making process can be broken down into 5 steps as below:
- Pick the sprite [rocketship]
- Control the sprite [with up and down arrow keys]
- Add the enemies [rocks]
- Shoot the laser [sprite]
- Keep score
How to make a rocket blaster game in Scratch? – Step-by-step guide
The step-by-step guide on creating the flying game on Scratch is explained below:
Step 1: Pick the sprite [Rocketship]
Let’s pick a spaceship sprite for the game.
- First, delete the Cat sprite.
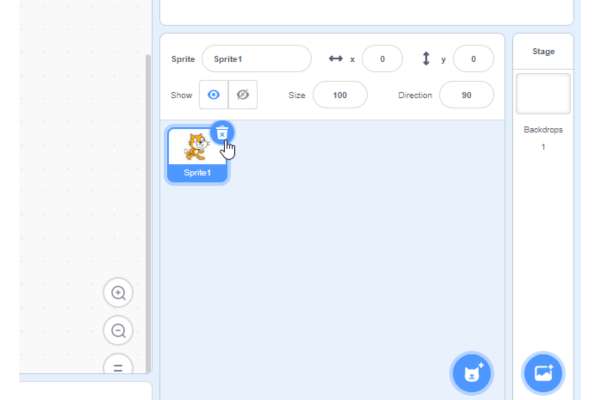
- Click on “Choose a Sprite”
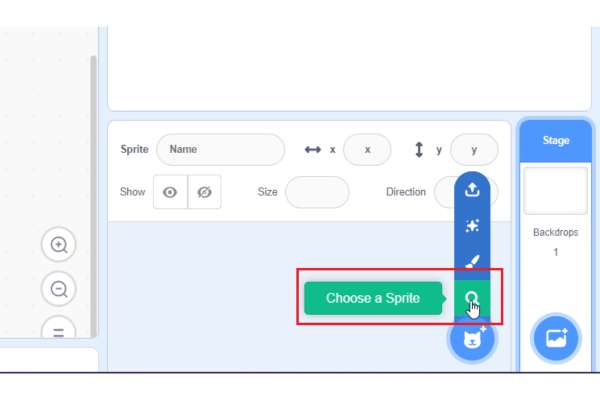
- Search rocketship and click on it.
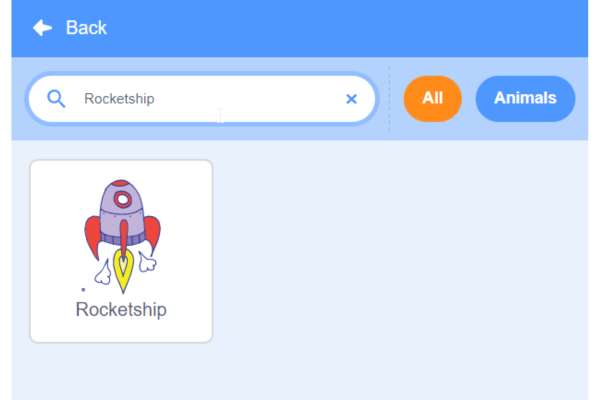
- Rocketship added.
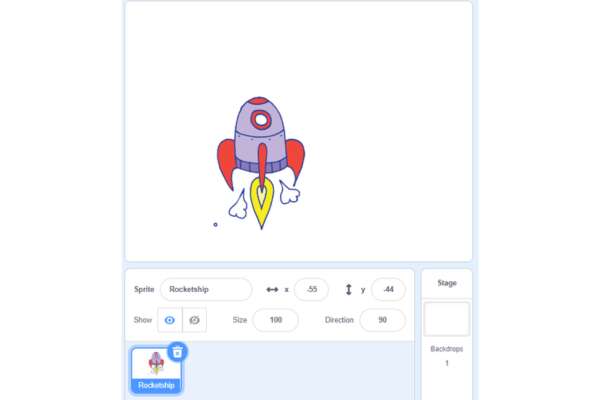
- Change the size and direction of the “rocketship” as shown below.
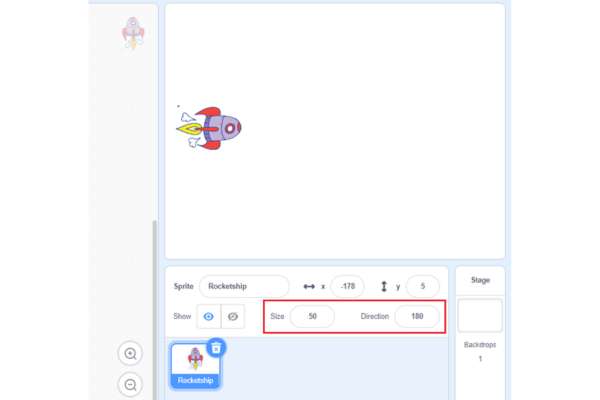
- Let’s choose a backdrop for the game. Click on “Choose a Backdrop”
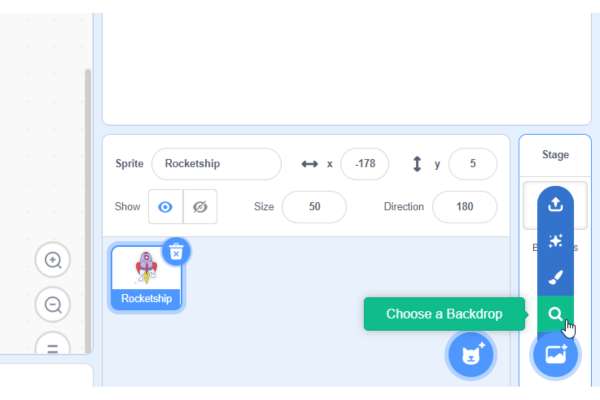
- Type and search “Stars” and click on it.
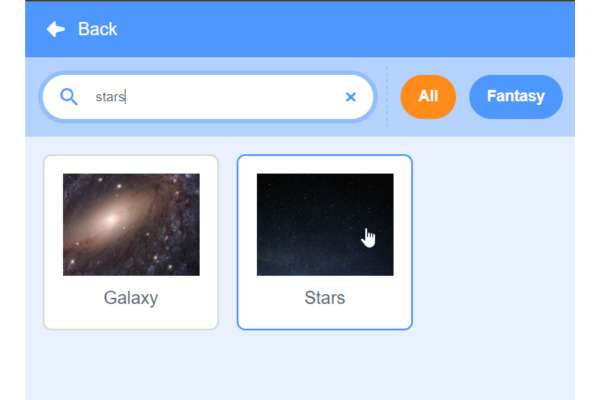
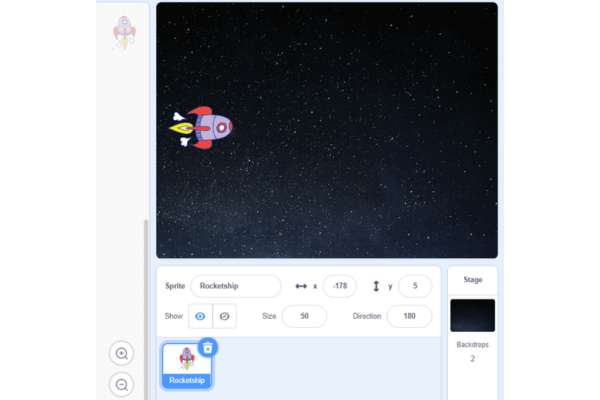
- Star backdrop added.
Step 2: Control the sprite [with Up & Down arrow keys]
- As we want to move the rocketship in up & down order we have to do that by changing the y value.
- Drag & drop the “change y by” block from the “motion category” positive y value will move upward, and the negative y value will move downward.

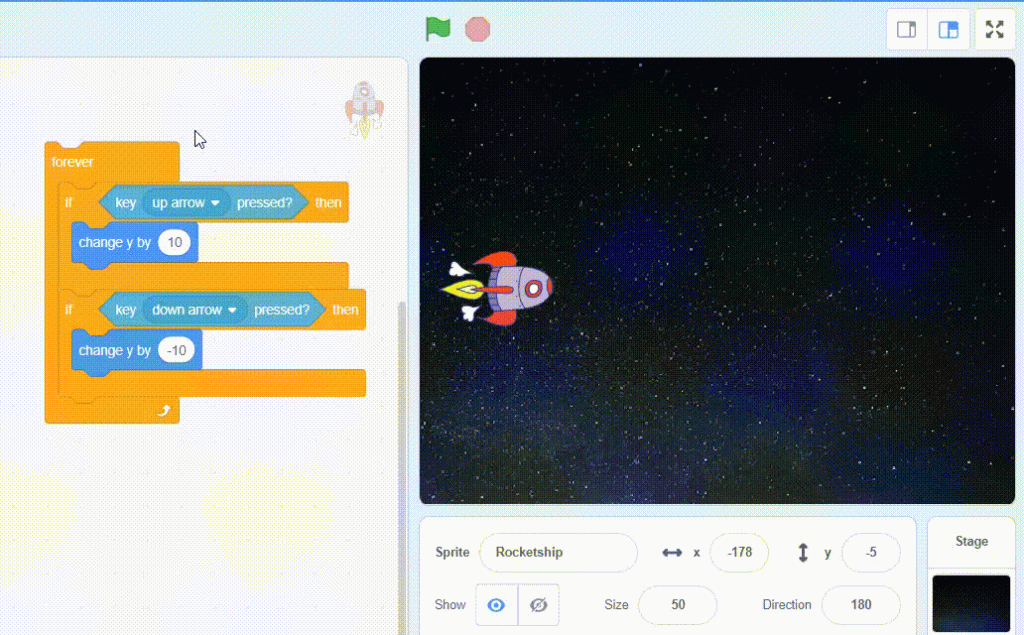
- Control rocketship with up & down arrow keys.
- Write a conditional statement to determine whether the “up arrow” key is pressed or not.
- Drag and drop the “if-then” block from the “Control” category as shown below.
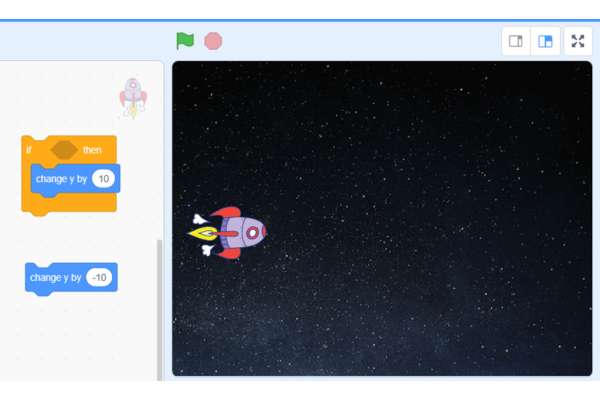
- From the “sensing category” drag and drop the “key pressed?” block and click on the drop-down and select “up arrow” as shown below.
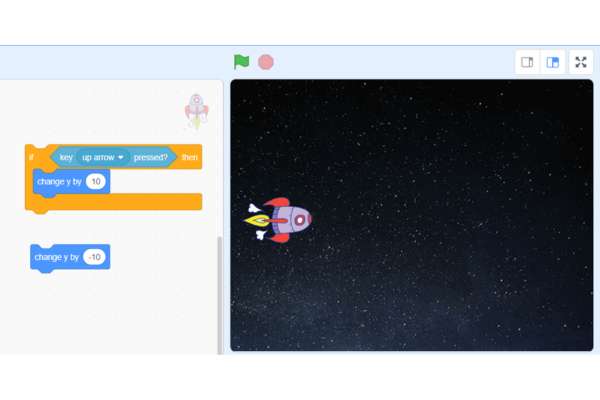
- Similarly, write a conditional statement for the “down arrow” key as shown below.
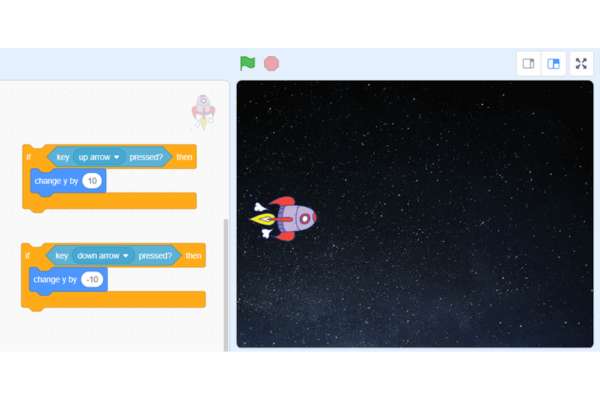
- To check the condition continuously whether the up-arrow and down-arrow key is pressed or not put this code in the “forever” loop.
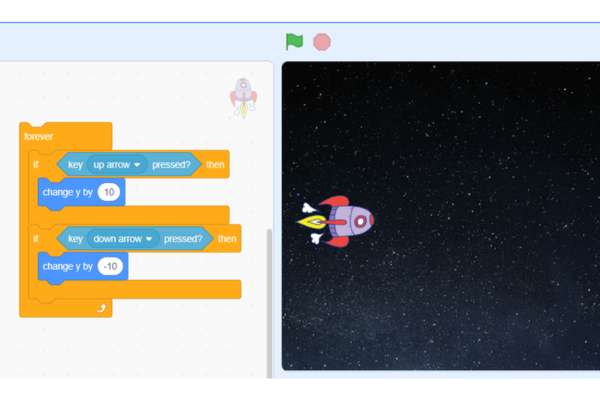
- Click on “forever” as shown below.
- You can control the rocketship in upward & downward order using the up & down arrow keys.
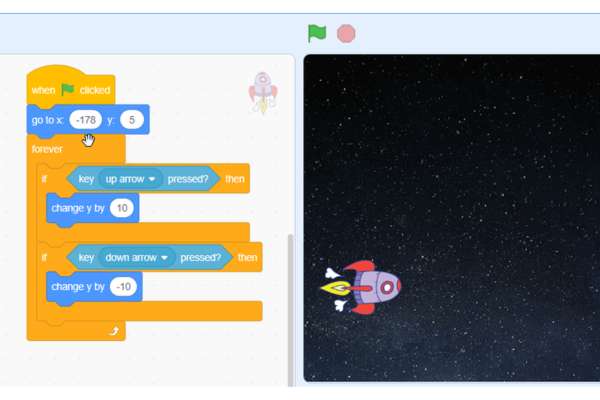
- Make a starting point for the rocketship when the game start.
- Drag & drop the “go to x y” block and set the value (-178, 5).
- Drag & drop the “when green flag clicked” block on top as shown below.
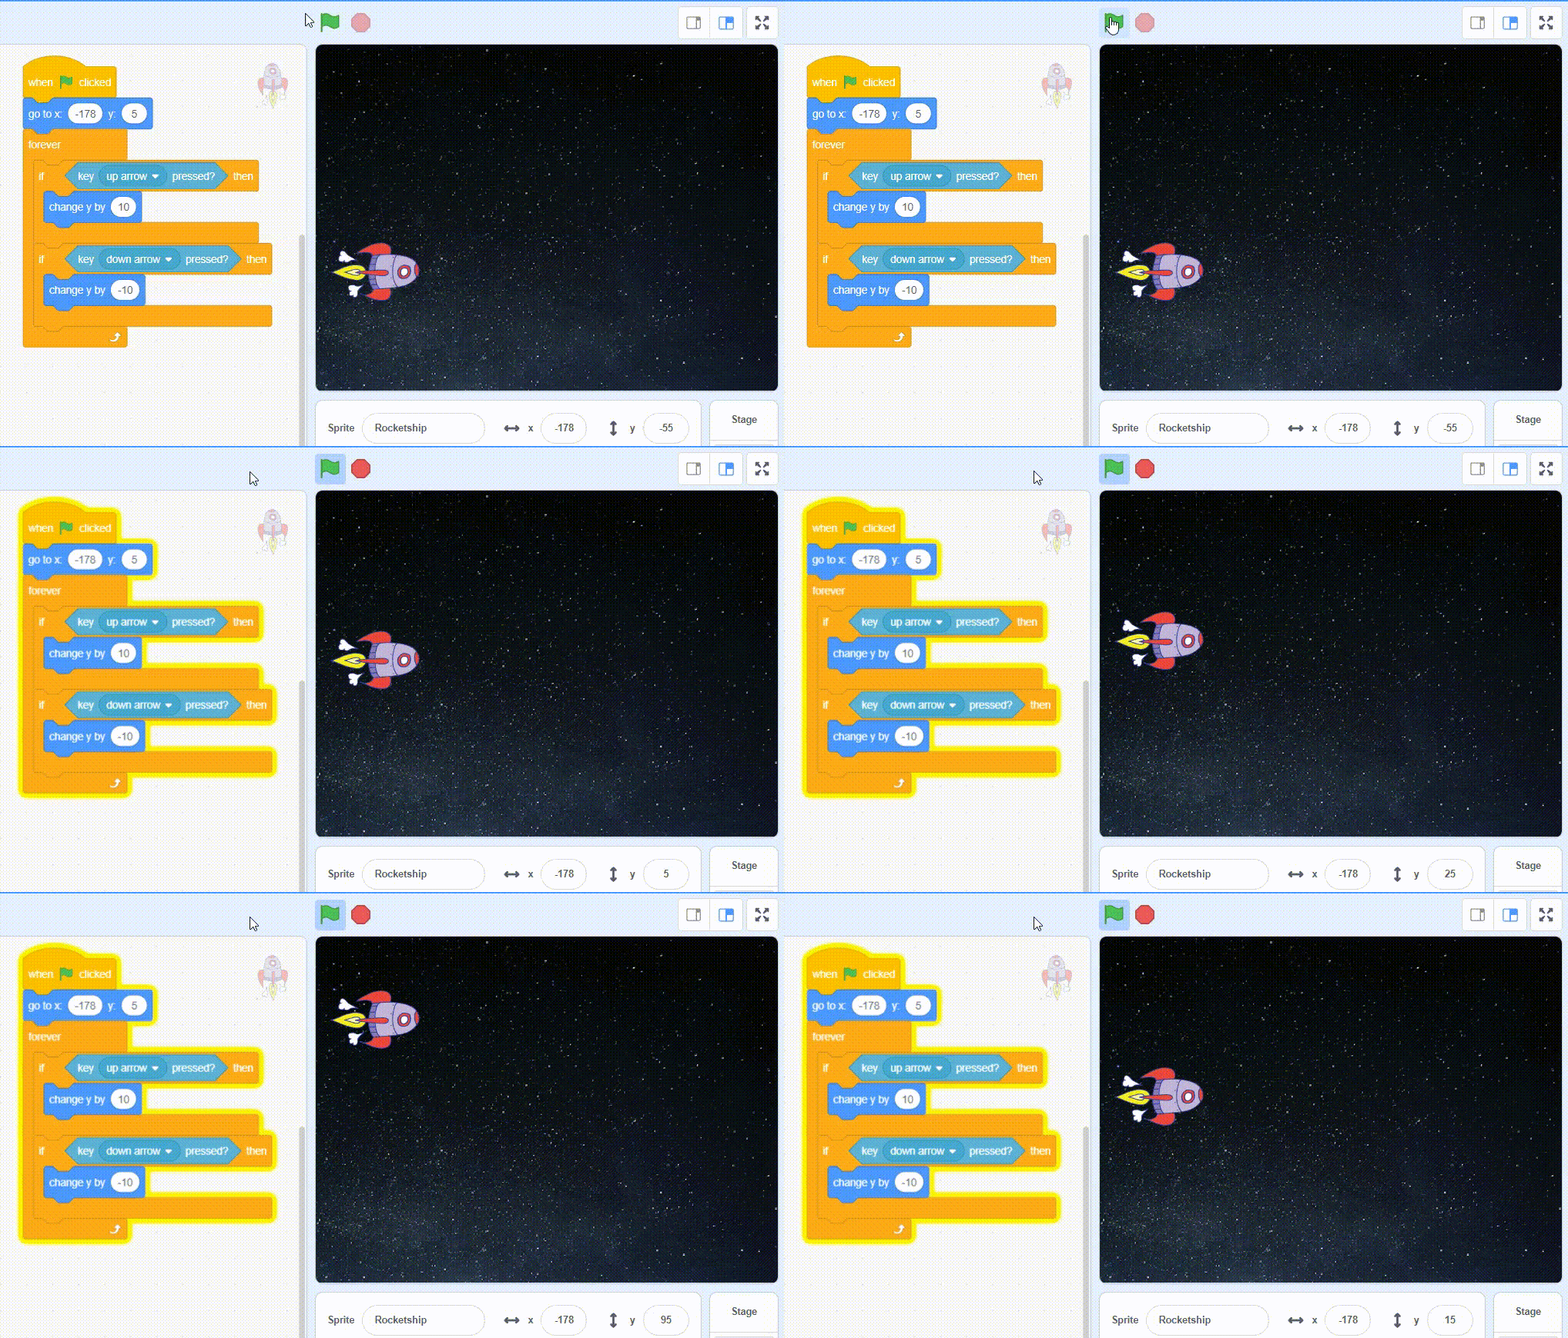
- Click on the “green flag”.
- Rocketship comes to the start point (-178, 5) when the game start.
Step 3: Add the enemies [rocks]
Now, let’s add an enemy sprite [rock] to the game.
- Click on “Choose a Sprite”.
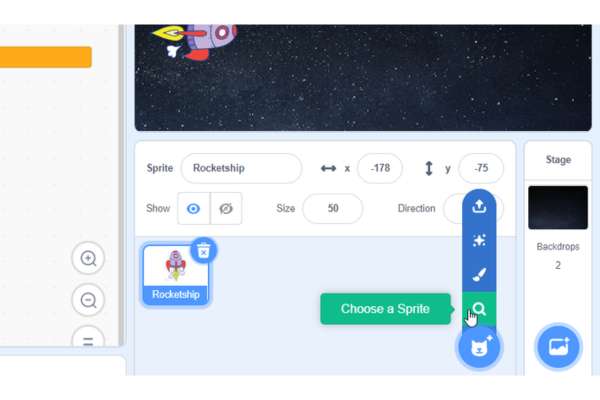
- Type rock and click on it.
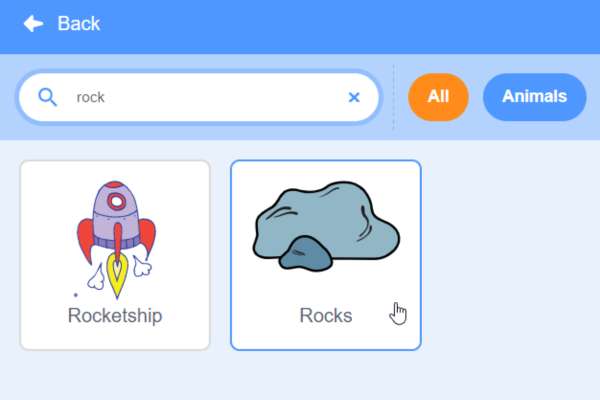
- Rock sprite added.
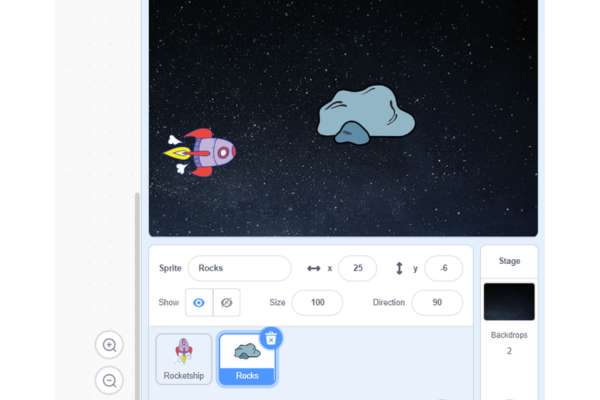
- To make the game design cool, reduce the size of your sprite rock. Also, set the direction 90 as shown below.
- Place the rock on the right side of the rocketship because the rock should come from right to left.
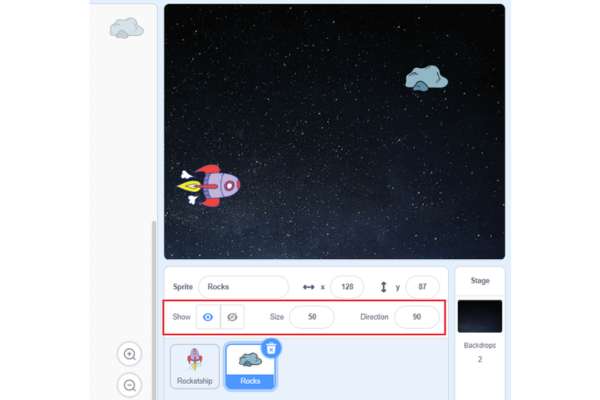
- Make multiple rocks that will come as enemies. In Scratch, using clone, we can do this.
- First, make it visible when the game start.
- Drag & drop “when green flag clicked” and “show” blocks as shown below.
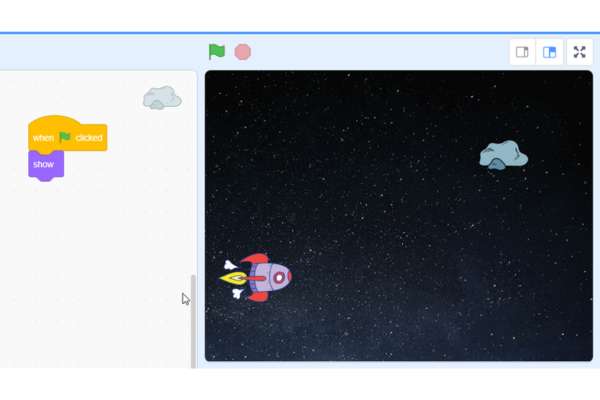
- Let’s make five clones of rock.
- Drag & drop the “repeat” loop and run it five times.
- Drag & drop the “create a clone of myself” block as shown below.
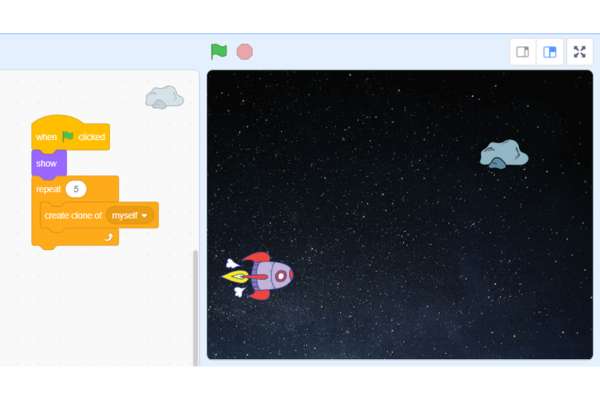
- After this, drag and drop a “hide” block as shown below.
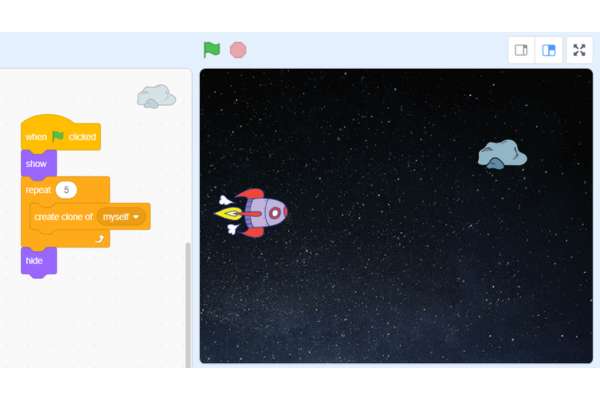
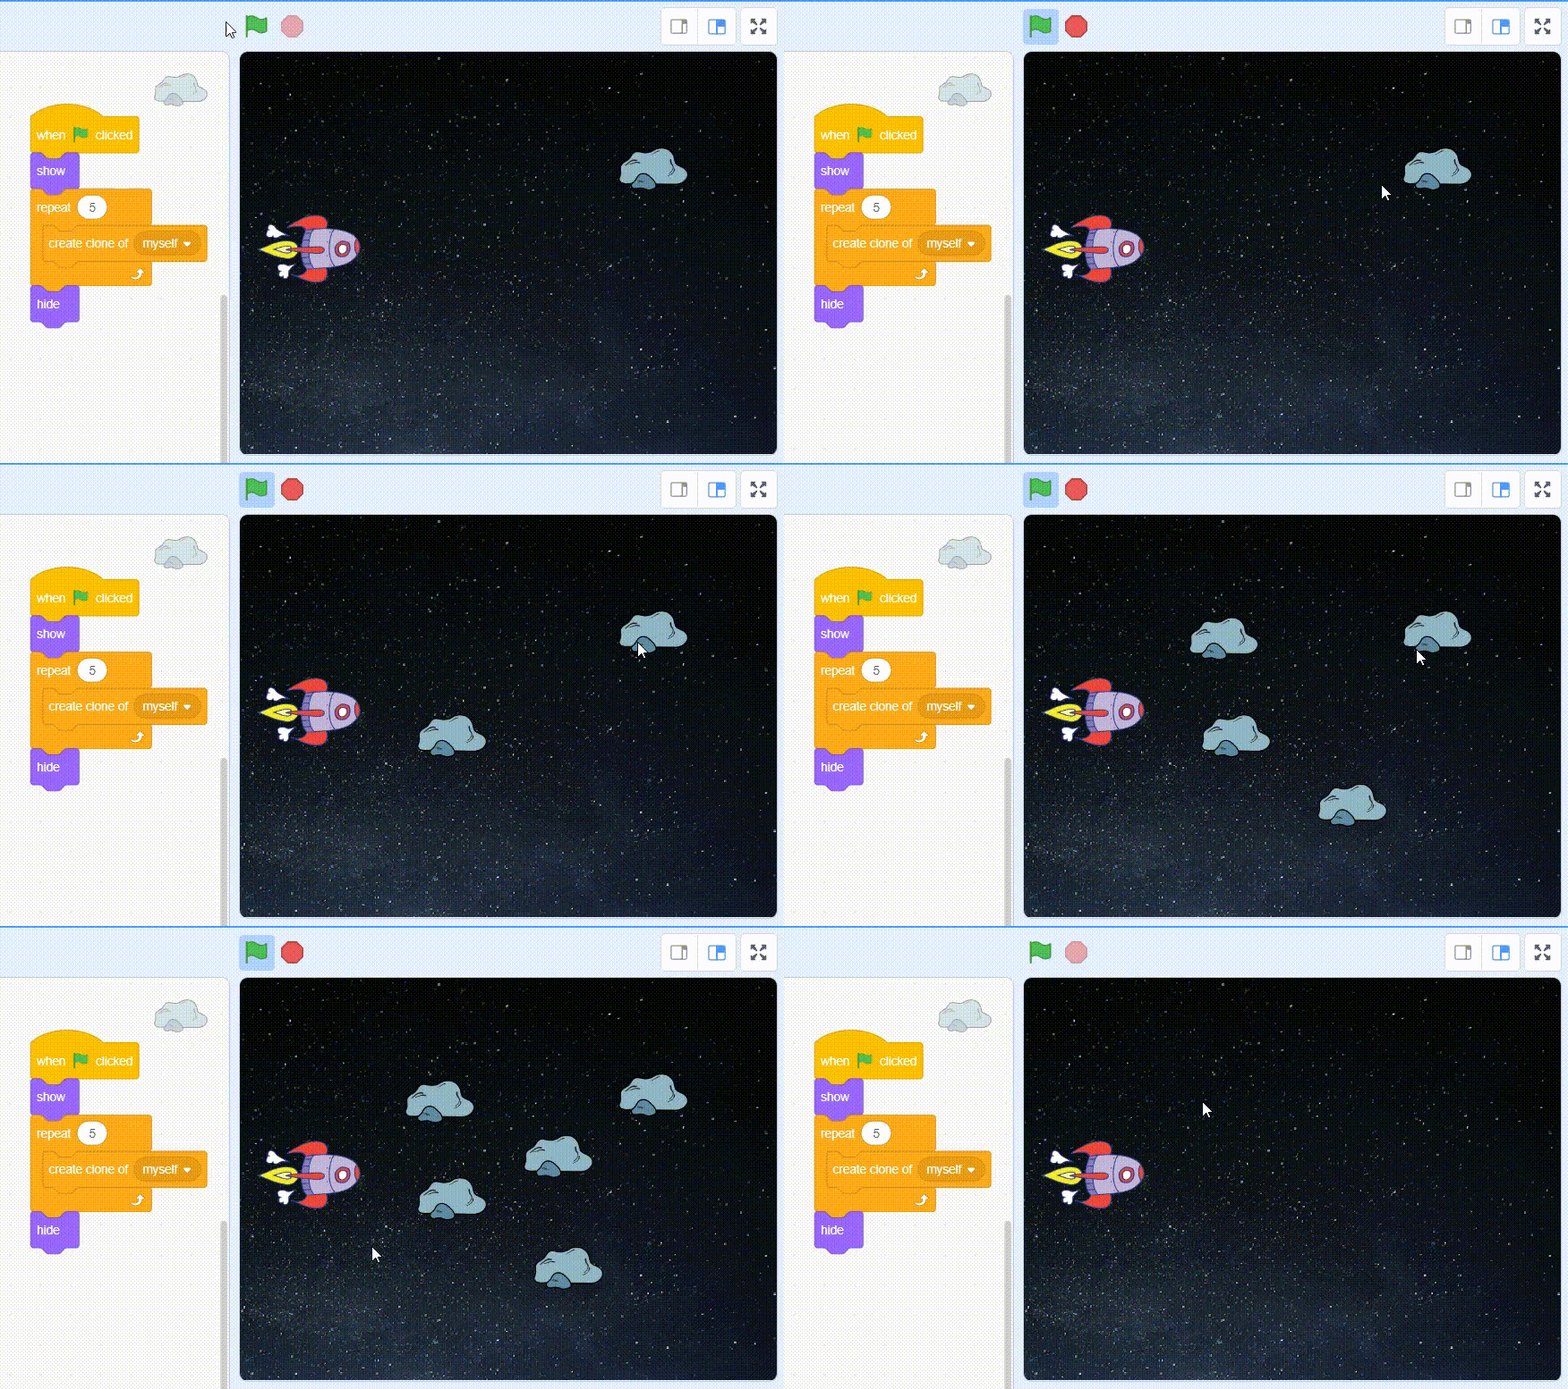
- Click on the “green flag”.
- You can see five clones of rock created.
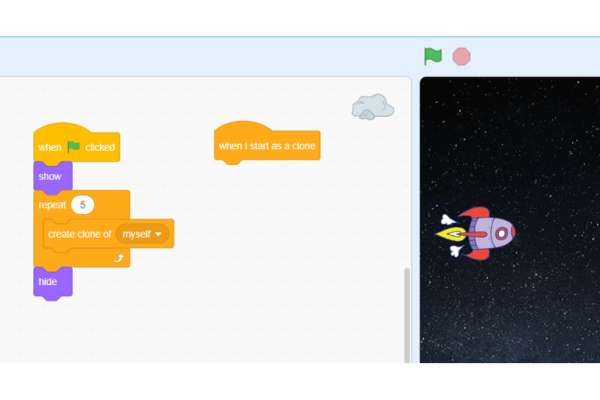
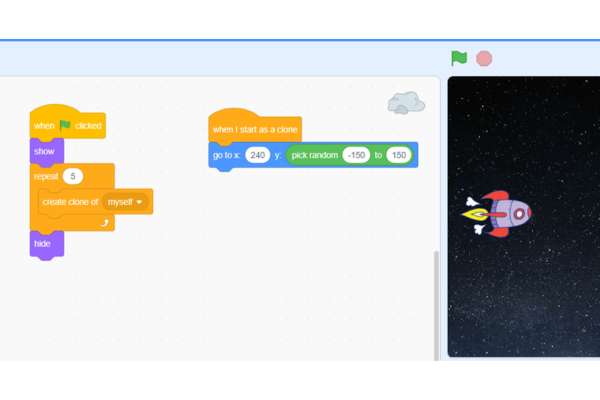
- In Scratch, you can program the clones using “when I start as a clone”?
- Let’s write the code when rocks started as a clone.
- Drag and drop the “when I start as a clone” block.
- Set the clone position when they started as clones.
- Drag & drop the “go to x y” block and set the (x, Y) coordinates.
- Set x 240 to the right edge of the stage area, and make the y value random so that the rock comes from a random height.
- Drag and drop the “pick random to” block as shown below.
- Click on the “green flag”.
- You can see rocks appear on the right edge of the stage and at random heights.
- But rocks are not moving towards the rocket ship.
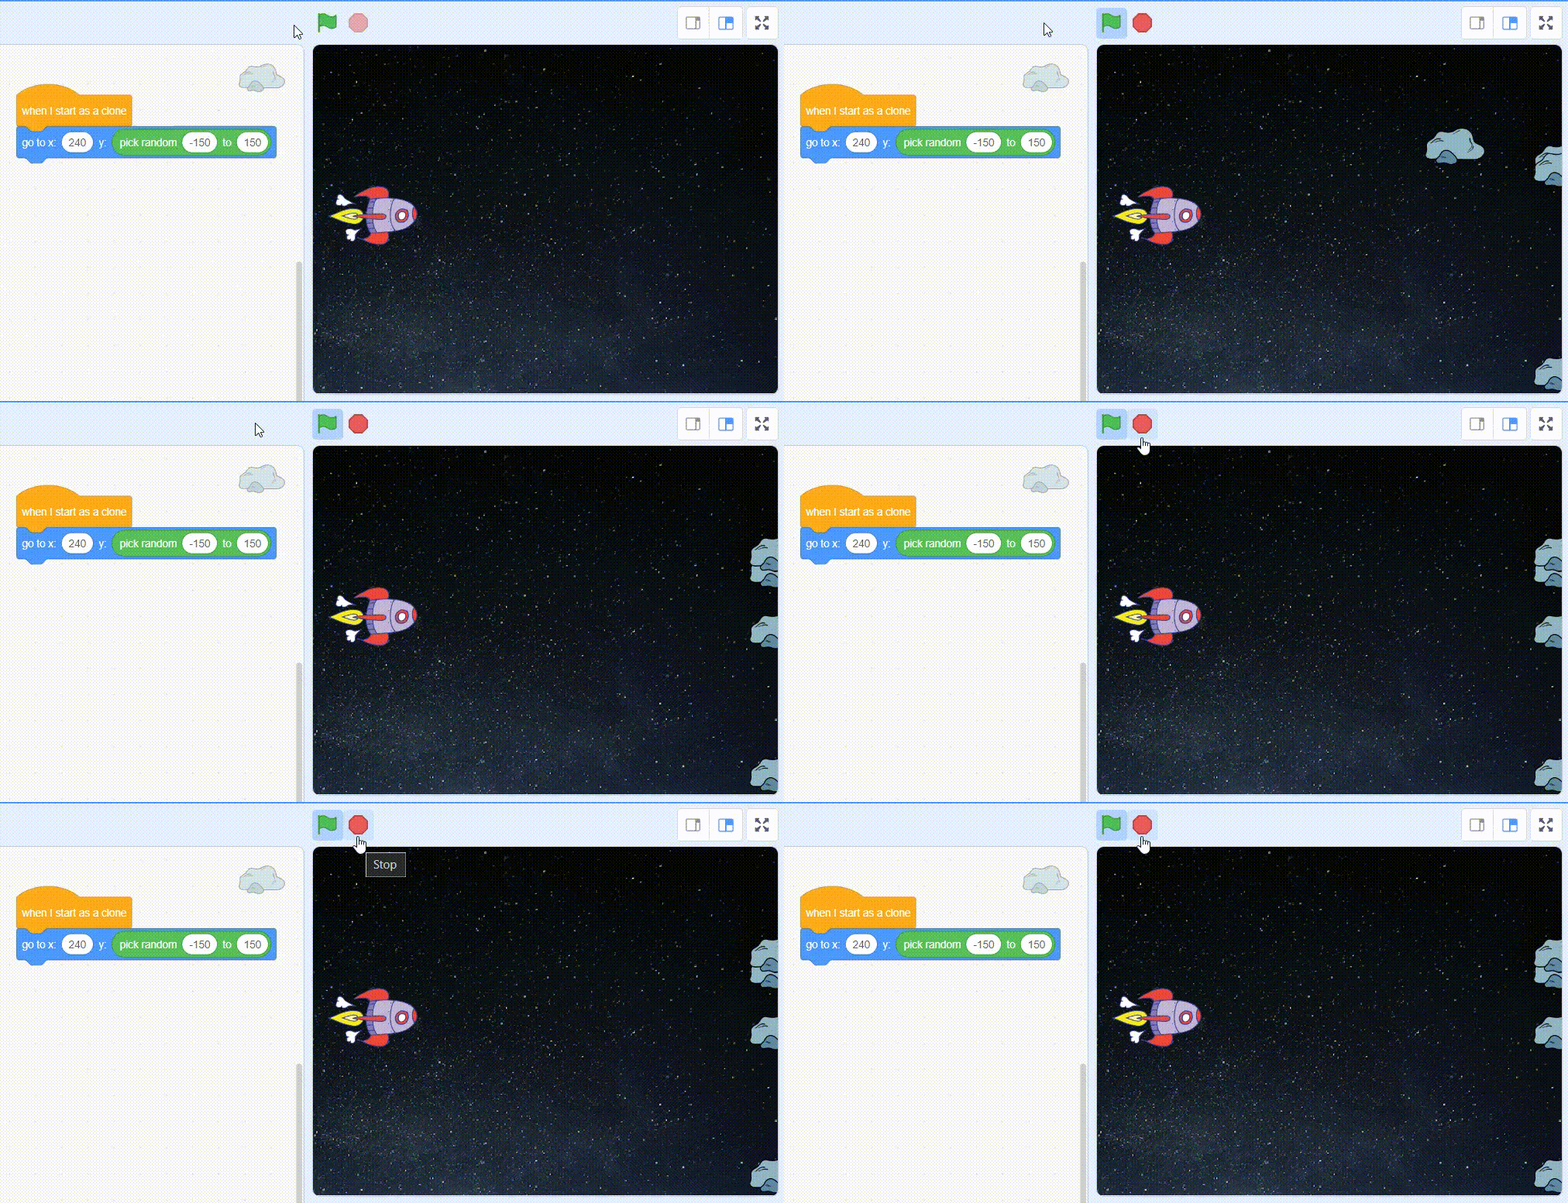
- To move the rocks towards the rocketship change the rock’s x position by negative values.
- First, add a conditional loop to check whether the rocks touch the rocket ship.
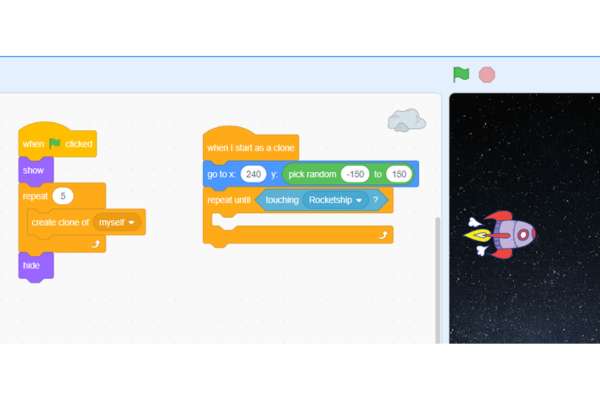
- Drag & drop the “change x by” block as shown below.
- Set the x value by -5; this value will decide how fast rocks come toward the rocket ship.
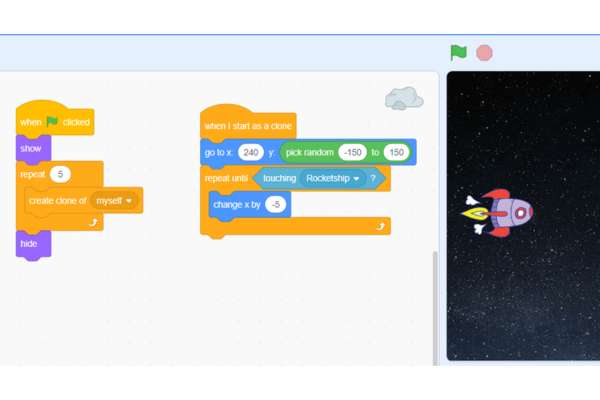
- Click on the “green flag”.
- Now, rocks can move toward the rocket ship.
- But rocks are stuck at the left edge of the stage and should go back to the right edge once they touch the left edge of the stage.
- Write a conditional statement to determine whether rocks touch the left edge of the stage.
- Drag and drop “if-then” and “less than” blocks as shown below.
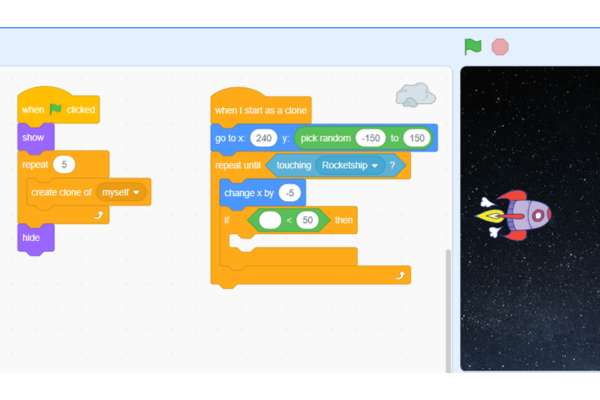
- Drag & drop the “x position” block to the “less than” block as shown below.
- Set the threshold x value -220 (just after rocketship)
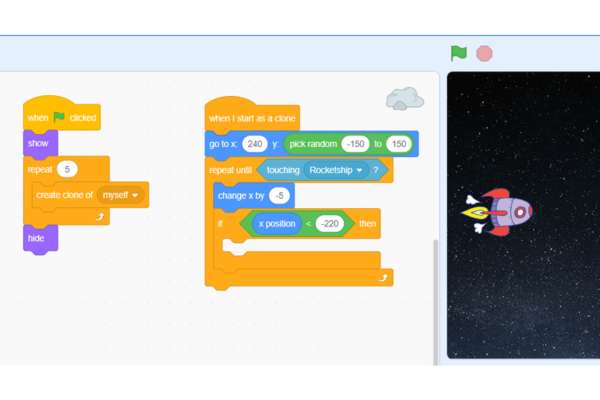
- If rocks touch the left edge of the stage then move the rocks to the right edge of the stage.
- Drag & drop the “go to x y” block and set the (x, Y) coordinates.
- Set x 240 to the right edge of the stage, and make y value random so that the rock comes from a random height.
- Drag and drop the “pick random to” block as shown below.
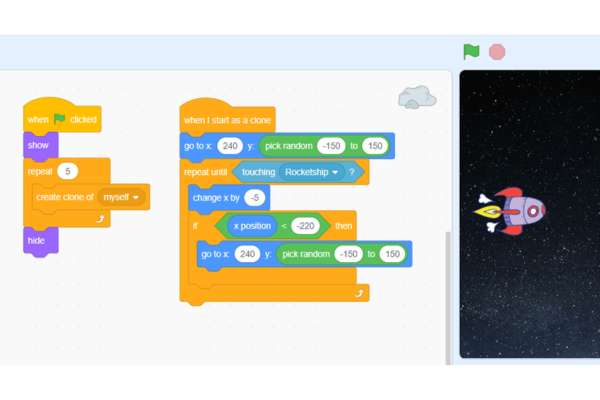
- Click on the “green flag”.
- Now, rocks can go back to their original position (right edge of the stage) it touches the left edge of the stage.
- But all rocks come at the same speed every time. To enhance the game, let’s make it random.
- First, create a variable.
- Click on the “Variables” category, then click on “Make a Variable”
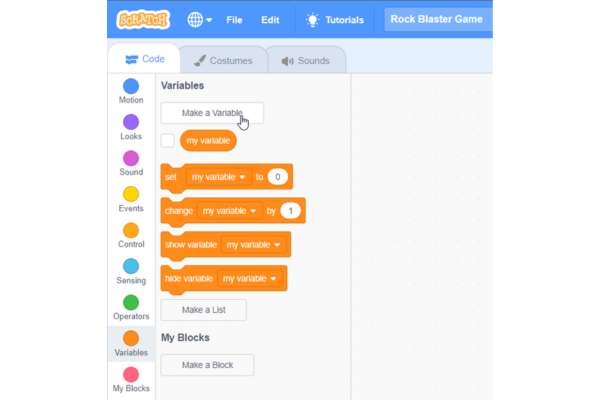
- Name your variable and click on “OK”.
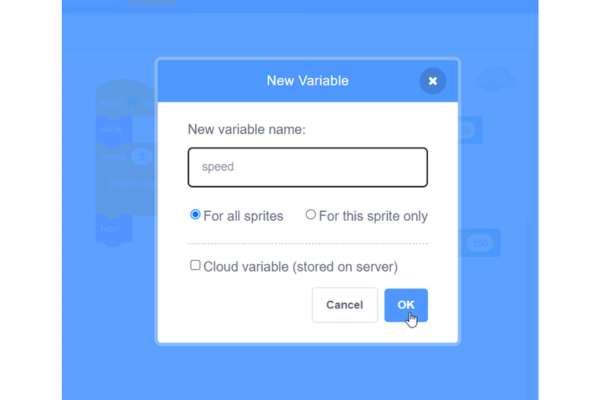
- Speed variable created.
- Drag & drop the “set speed to” block as shown below.
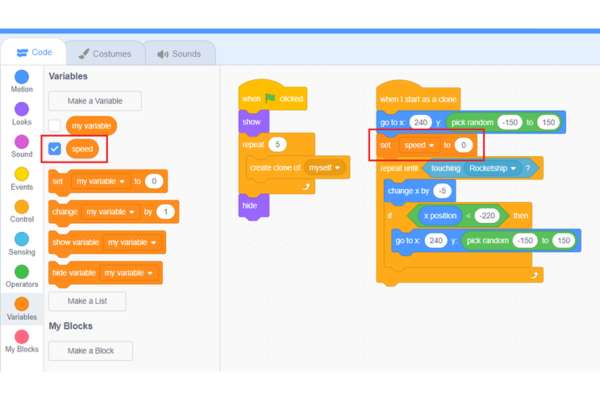
- To make the rock move at speed random, drag & drop “pick random to” block to “set speed to” block and set the value -2 to -6; you can choose any.
- Now random rock speed is stored in the “speed” variable.
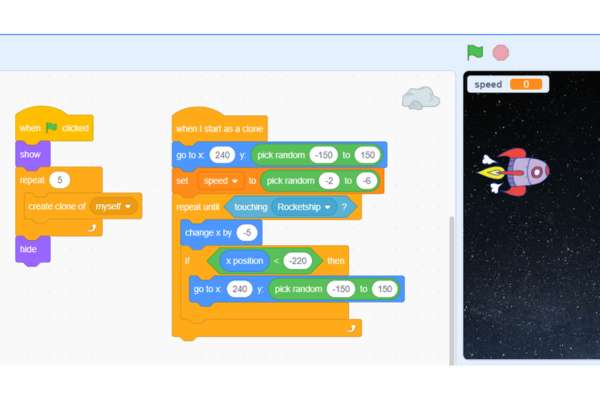
- Drag & drop the “speed” variable to the “change x by” block as shown below.
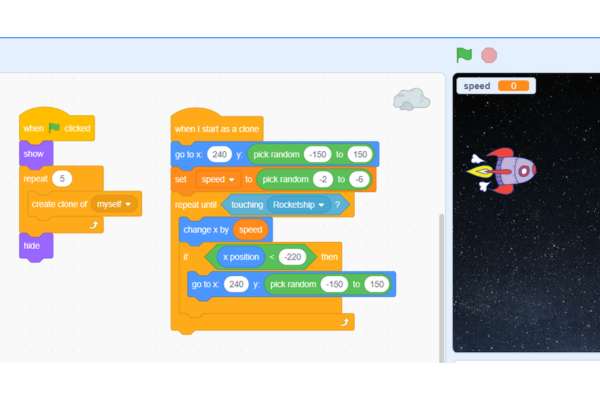
- Click on the “green flag”.
- Rocks come at different speeds.
Step 4: Shoot the Laser [Sprite]
Now, let’s add the laser sprite (bullets) to the rocket ship that will be used to blast the rock.
- Click on “Choose a Sprite”.
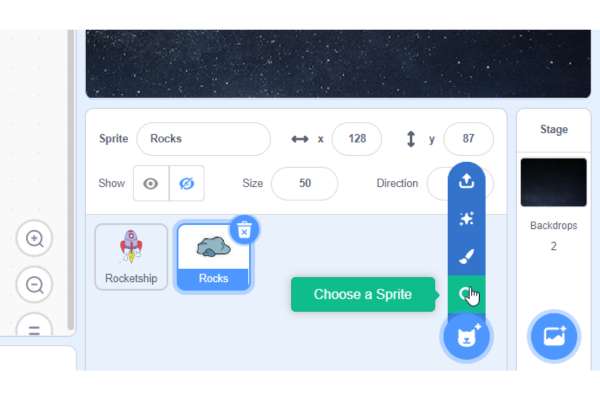
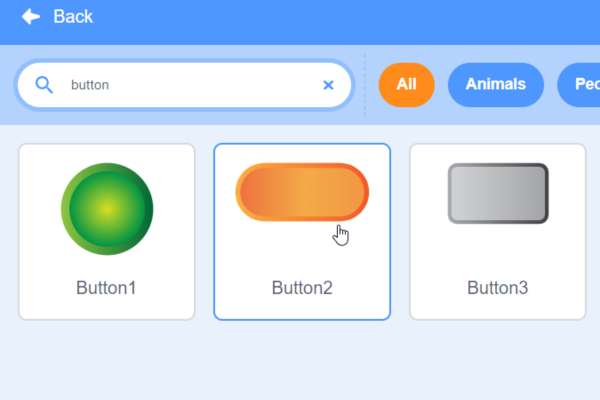
- You can choose any but let’s select something rectangular because by reducing their size, it will look like laser/bullets.
- In Scratch, you can use “Button2”, so search and click on it.
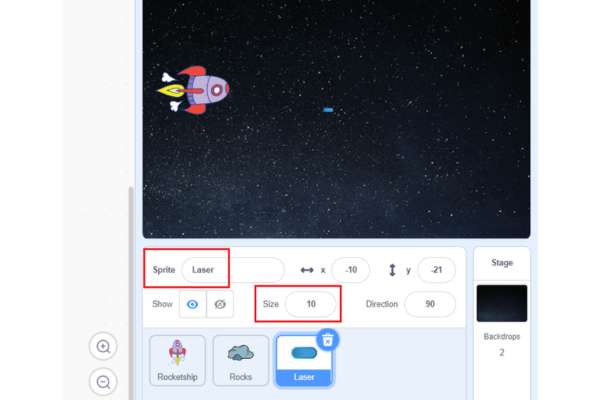
- Rename the “Button2” sprite and set the size 10.
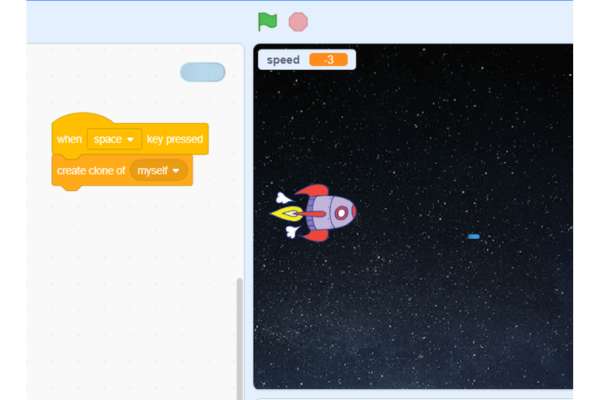
- Make the rocketship shoot a laser/bullet by pressing the spacebar key.
- Drag & drop “when space key pressed” and “create clone of myself” blocks as shown below.
- Click on the “green flag”.
- By pressing the “spacebar” key laser clones are created.
- Make laser clone sprites start from the rocketship so that it can seem like a bullets/laser shoot.
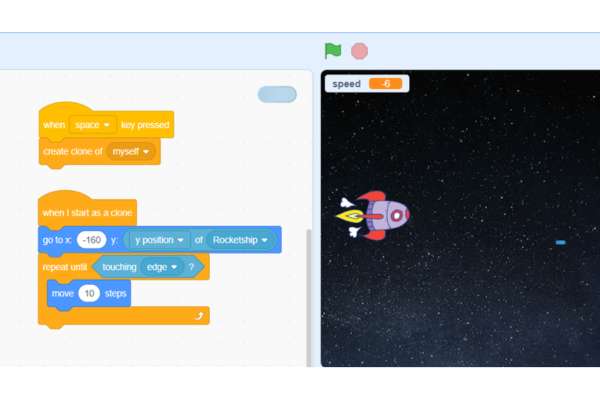
- Drag & drop “when I start as a clone” and “go to x y” blocks as shown below
- Set the x position to -160 (on rocketship) and make the rocks y position to the same rocketship y position.
- You can do that using “backdrop# of Stage” from the “sensing” category.
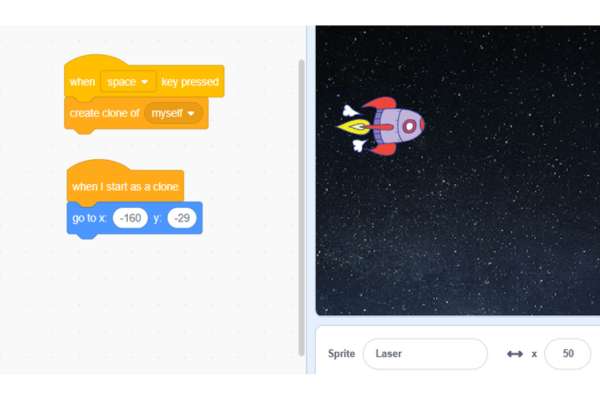
- Drag the “backdrop# of Stage” from the “sensing” category.
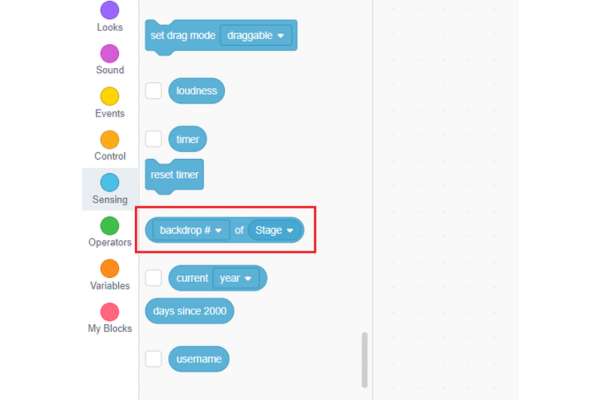
- Drop the “backdrop# of Stage” block and change “Stage” to “Rocketship”.
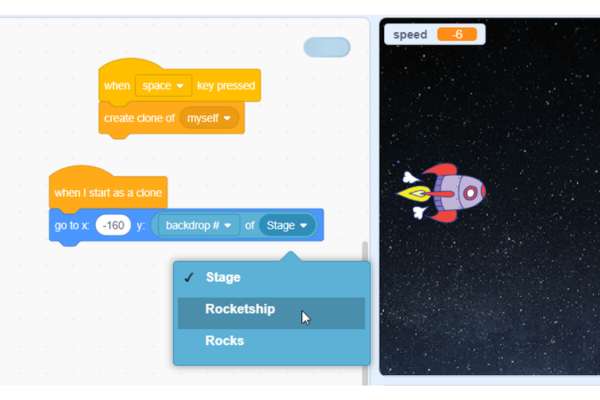
- And, change “backdrop” to “y position”.
- Now, add a conditional statement loop till laser clones touch the stage edge.
- Drag & drop “repeat until” and “touching edge?” blocks as shown below.
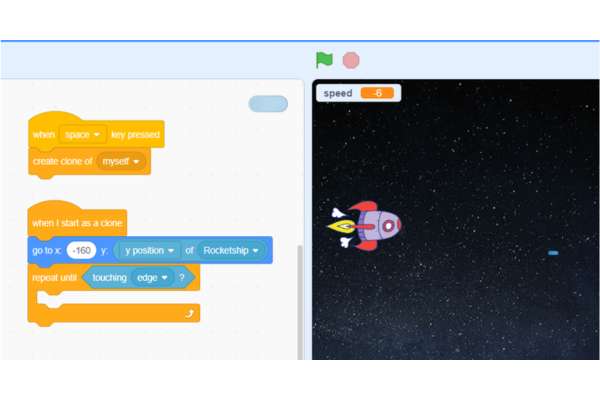
- Till the laser clones touch the stage edge move the laser.
- Drag & drop the “move steps” block shown below.
- Click on the “green flag”.
- Rocketship can shoot the laser.
- But the first laser is neither moving nor disappearing.
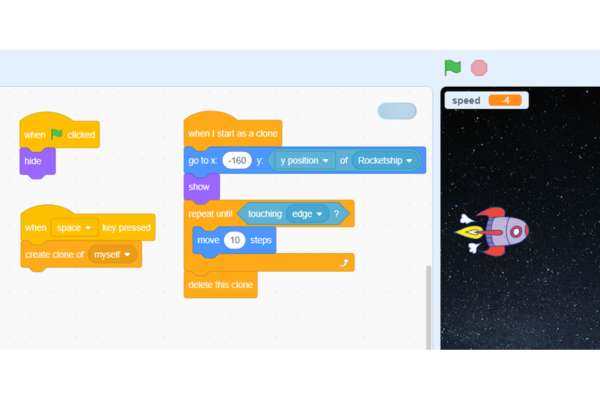
- Drag & drop “when green flag clicked” and “hide” blocks as shown below.
- Also, delete the laser clones when they touch the edge.
- Drag & drop the “delete this clone” block as shown below.
- Click on the “green flag”.
- The rocketship can move up and down using the up and down arrow keys, and if you hold down the spacebar key, it shoots lasers, which end up once the lasers reach the edge.
- But nothing is happening if rocks touch the rocketship and the laser touches the rocks.
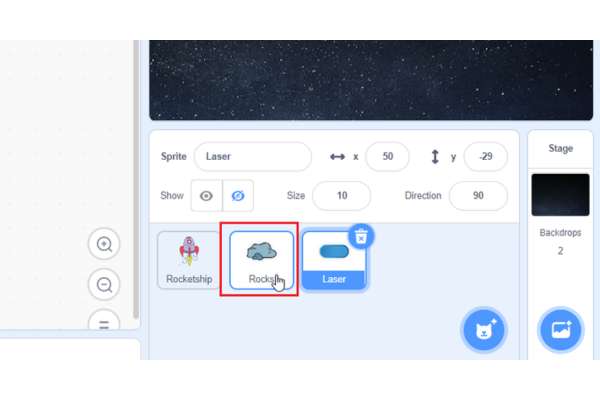
- Click on the “Rocks” sprite to program it.
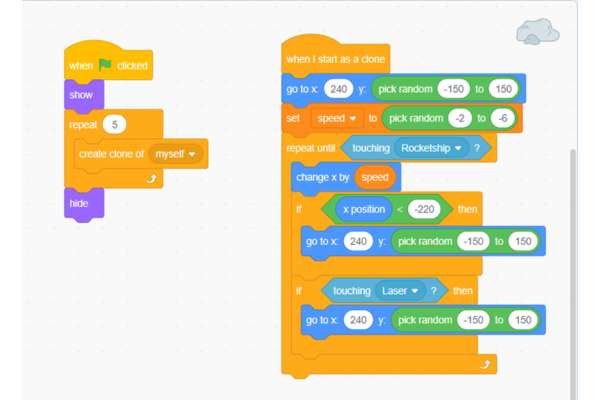
- Write a conditional statement to determine whether rocks touch the laser.
- Drag & drop “if-then” and “touching laser” blocks as shown below.
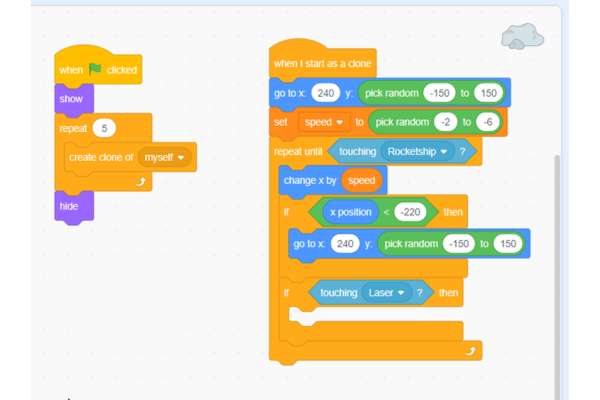
- Drag & drop the “go to x y” block and set the (x, Y) coordinates.
- Set x 240 to the right edge of the stage, and make y value random so that the rock comes from a random height.
- Drag & drop the “pick random to” block as shown below.
- Click on the “green flag”.
- Now, if the laser touches the rocks, the rocks are destroyed.
- But nothing is happening if the rocketship touches the rocks.
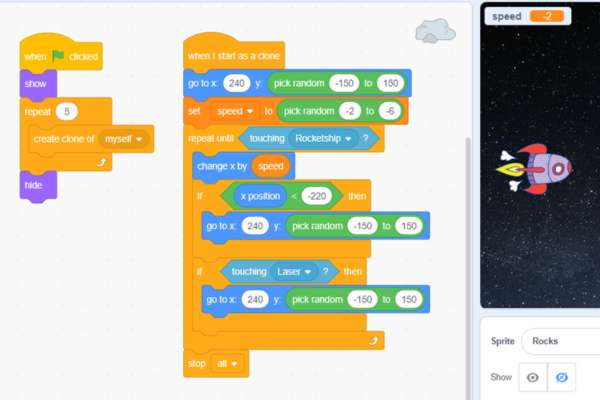
- Let’s stop the game if the rocketship touches the rocks.
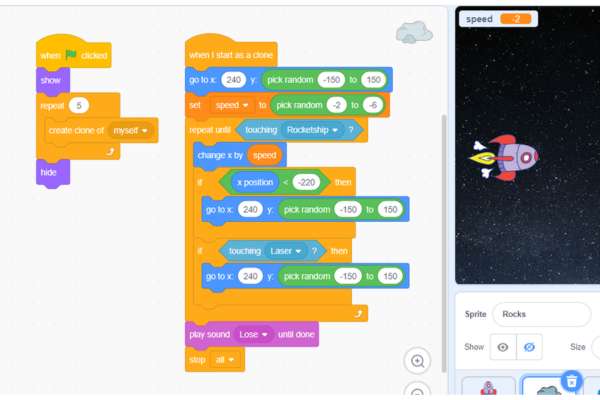
- Drag & drop the “stop all” block to the end of the “repeat until” loop because this loop only ends when the rocketship touches the rocks.
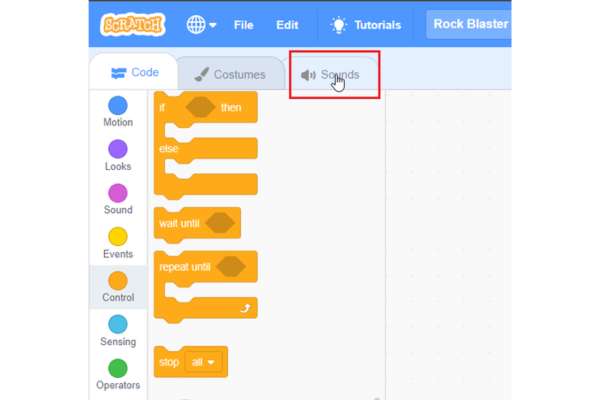
- To enhance the game let’s add a sound effect when the game gets over (stop all).
- Click on the “Sounds”.
- Click on the “Choose a Sound”.
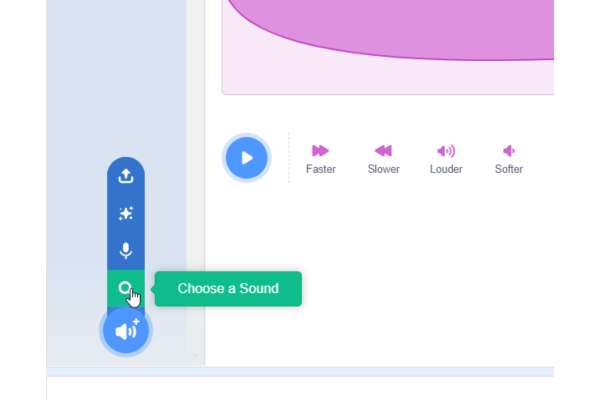
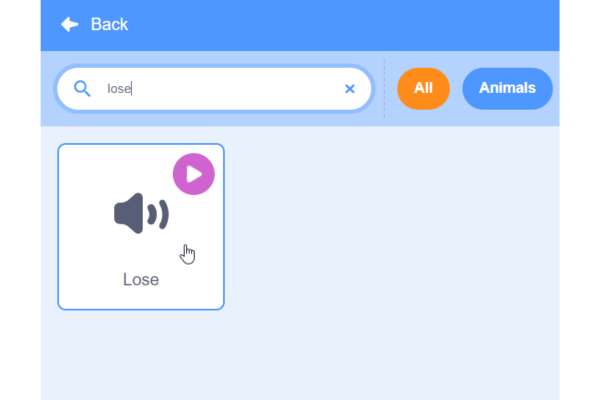
- Search “lose” and click on it.
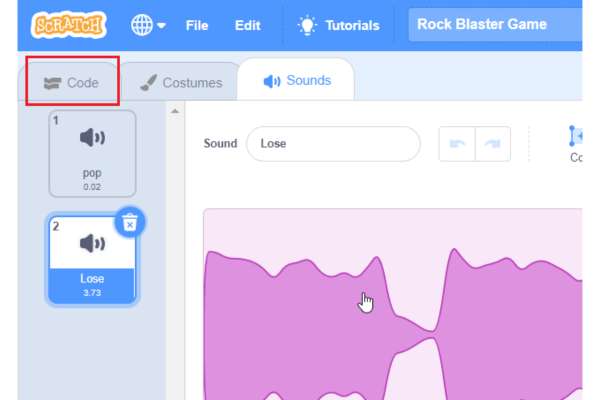
- Get back to the code, click on the “Code”.
- Drag & drop the “play sound Lose until done” block as shown below.
- Click on the “green flag”.
- Now, if the rocketship touches the rocks, the game stops with a sound.
Step 5: Set the score
- Let’s add the score to the game when the rocketship shoots the rocks.
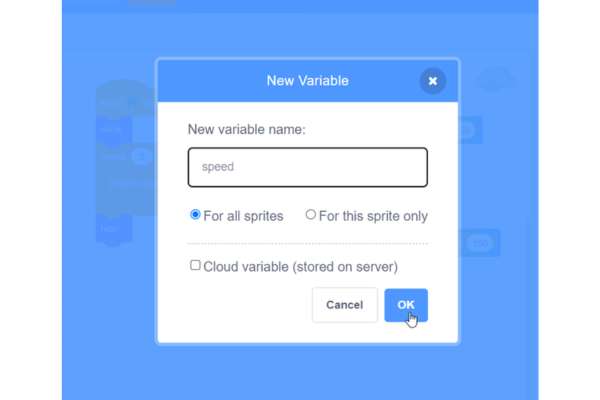
- Create a variable to keep track of the score.
- Click on the “Variables” category and click on the “Make a Variable”.
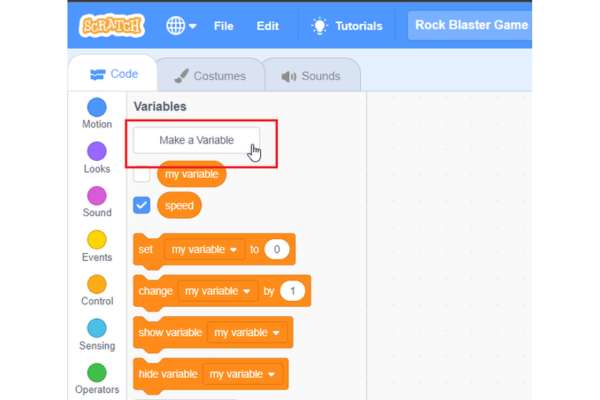
- Name your variable.
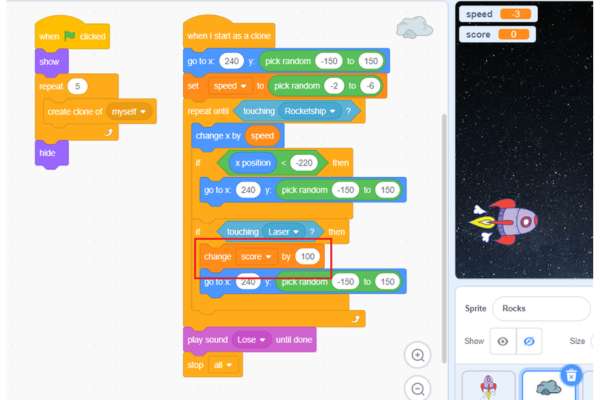
- Change the score by 100 when the laser touches the rock.
- Drag & drop “change score by 100” as shown below.
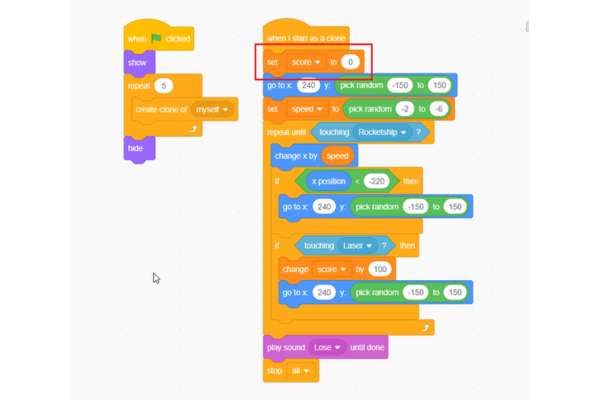
- Let make score zero when the game start.
- Drag & drop the “set score to” block as shown below and set its value to zero.
- Click on the “green flag”.
- When you shoot the rock you will get a score of 100.
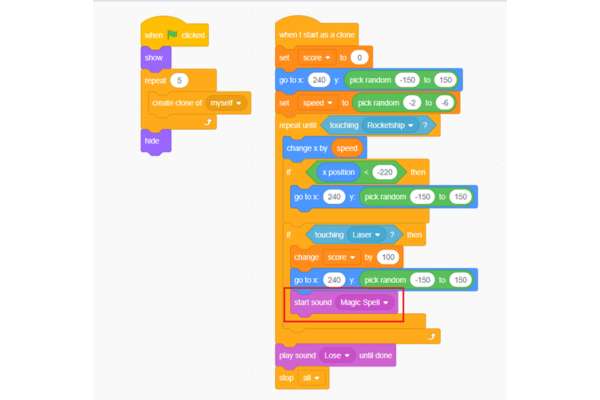
- Let’s add a sound when the score increase by 100.
- Click on “Sound” and click on “Choose a sound”.
- Search “magic spell” you can choose any, and click on it.
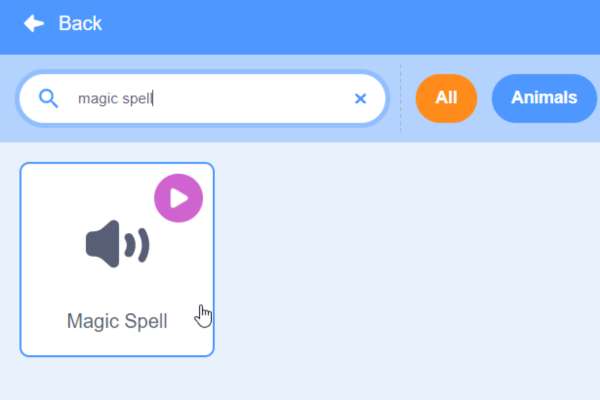
- Drag & drop the “start sound Magic Spell” block as shown below.
- Click on the “green flag”.
- A sound will play on each score gain.
- Now you are done.
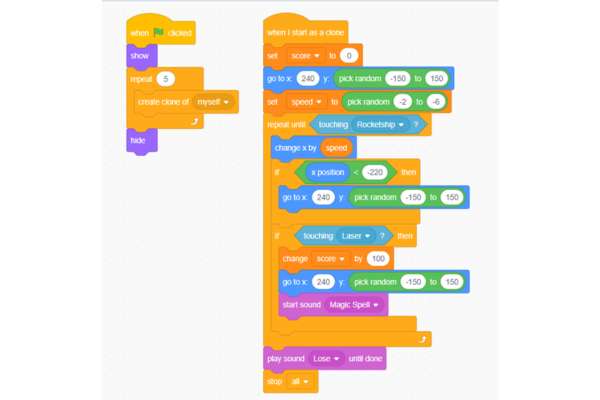
- Click on the “green flag” and enjoy your game.
Time to Play!
- Congratulations, You have completed the Rock blaster game in Scratch!
- Click on “green flag” to start playing the Rock blaster. What are the enhancements to the game you can think of? Do let us know in the comments section below.
Looking to learn Scratch coding? Explore Wiingy’s Online Scratch Coding Classes For Kids to learn from top Scratch coding experts.
Frequently asked questions (FAQs)
How to make a rock blaster game on Scratch?
To make the rock blaster game on Scratch follow the below steps:
- Pick the sprite [rocketship]
- Control the sprite [with up and down arrow keys]
- Add the enemies [rocks]
- Shoot the laser [sprite]
- Keep score
What is the rock blaster game on Scratch?
The rock blaster game on Scratch is where the spacecraft shoots out lasers and attacks oncoming rocks. If the laser toches the rock then the rock blasts and the score increases by 100 if the rock touches the spacecraft then it is game over.
What is the coolest game on Scratch?
Some of the coolest games on Scratch are Pokemon clicker, Flip 3D, Fortnite Z, Ball blast, Old western way, and many more!
What is the easiest game to code on Scratch?
The Maze game is the easiest game to code on Scratch.
We hope the tutorial has helped you in creating a rock blaster game on Scratch! Want to make more such games? Check out our beginner-friendly guide to Scratch games.

